
It has certainly been an exciting Summer's end at our house. I had a lot of fun participating in a Party Post series! Then, it was a bit quiet here for a couple of weeks. We welcomed Hubby home from a tour of the world for Disney Infinity, and met Leap's fabulous preschool teacher. Exciting things are happening this Fall!
Hubby and I love to create an atmosphere for Halloween, especially when we throw a Halloween party.
Of all the Halloween props and decorations I've purchased over the years, I can only remember buying two items from a Halloween store. Two. For me, it's a challenge to find authentic, family-friendly props there.
Today, I hope to give you a feel for how you can use [mostly] common items to create a completely different era and location for your next Halloween party. Here are 3 things a great Medieval Tavern needs.


I had my eye on this round woven basket from Target for some time, and just before Halloween last year I found this one discounted! I also found this great faux fur rug at Target. Encourage your guests to stay a while by offering them a place to check their weapons.
 needed wares
◊ fabric [we used a scrap of light colored linen]
◊ beans [nothing smaller]
◊ your prop weapon of choice
Because some of your filler will inevitably end up on the ground [when your toddler claims it for their own personal sensory bin and scatters handfuls like bird seed], choose a filler that's fairly easy to pick/sweep up.
We hinted at the basket's intended purpose by planting a few props of our own. Ours were made of cast iron, so we used our fireplace surround to help prop them up. The beans were primarily for weighing the basket down.


◊ thermal shirt
◊ sewing thread to match [thermal shirt]
◊ sewing machine
◊ stuffing
◊ red Sharpie marker
◊ wood post◊ [Christmas] tree stand
◊ nails
◊ rope
◊ tree skirt
First, I took the scissors to the thermal shirt, cutting the long sleeves short. For a more rugged/medieval look, I also cut the trim out of the neckline.
Then, with the shirt turned inside-out I used my sewing machine to run a basic stitch along the bottom and the sleeves to close them up. I can't thread a needle without referencing the manual - you can do this.
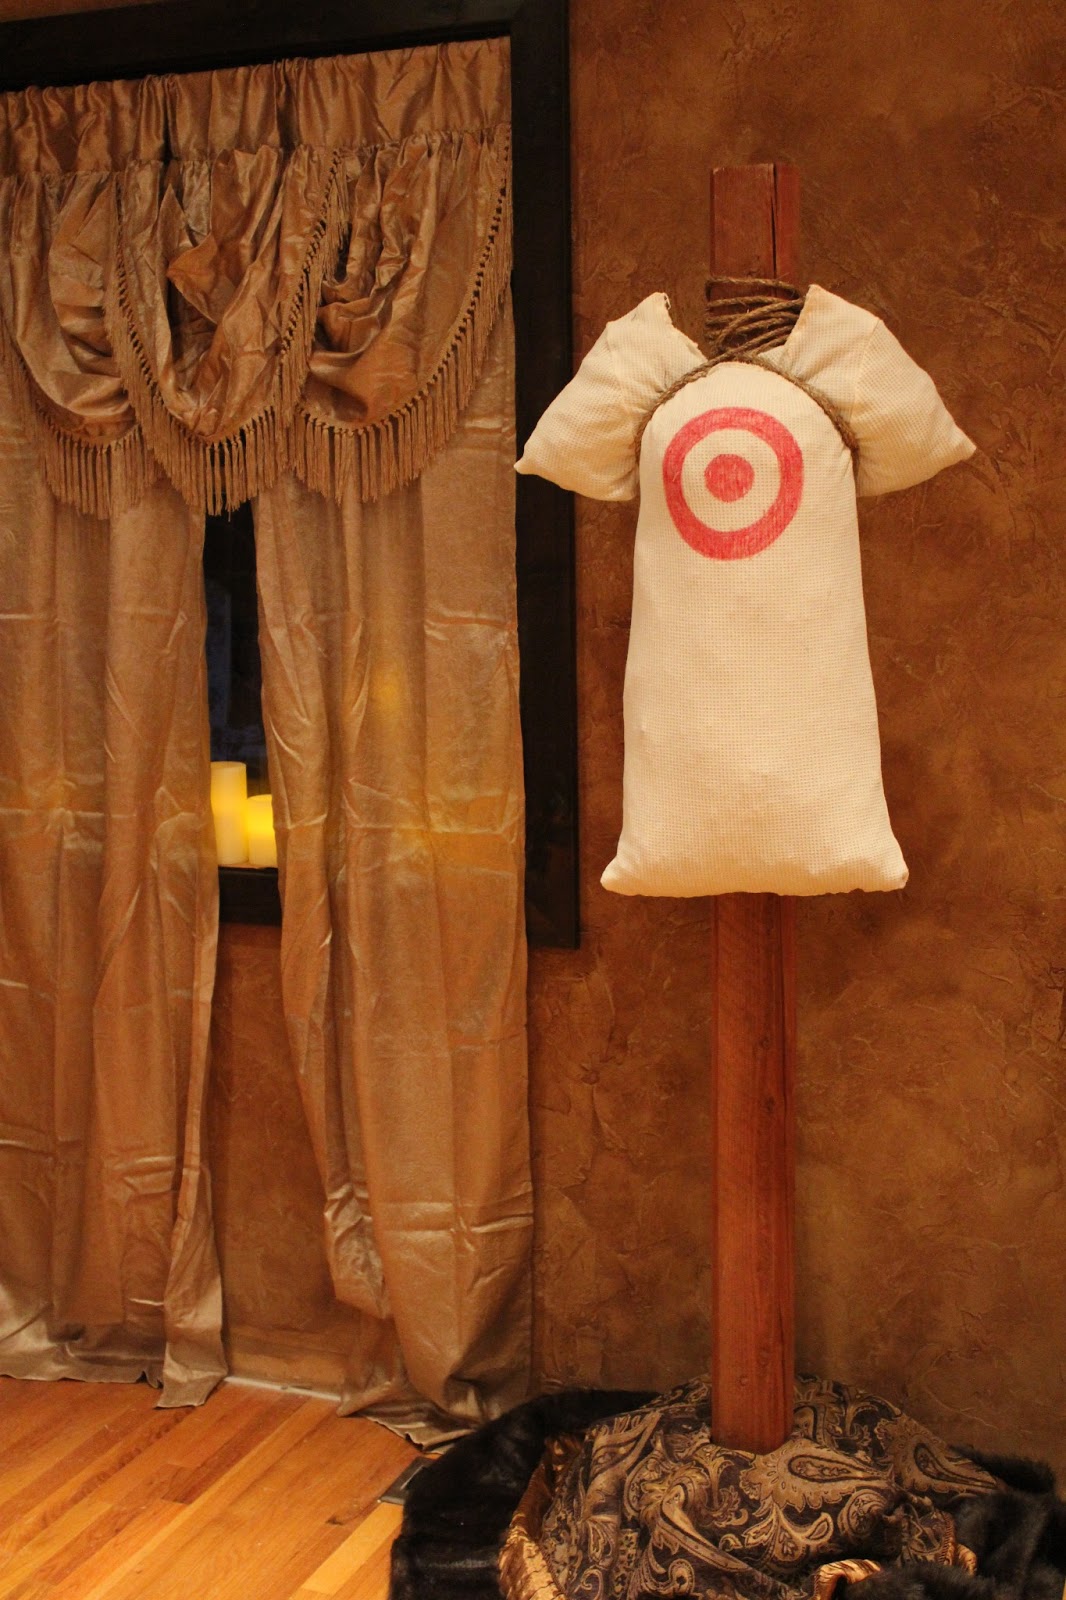
Next, I used various round dishes as guides to trace the circles of the target with my red Sharpie.
With the bottom and the sleeves stitched closed, I stuffed our dummy with decorative dried moss to give it a lumpy look. Once he was adequately stuffed, I stitched the top closed from the outside.
What I love about this project is the dummy looks more authentic if it isn't perfect! If I were to do it again, I'd do all of my stitching with the shirt right-side-out.
A Christmas tree stand held the wood post up nicely. I held the dummy where I wanted it and Hubby tied it up with a rope. One nail to the back of the post kept the rope from slipping down. Finally, we covered the stand with a tree skirt and DONE!

We thought a good tavern would have a hearty stew prepared to warm the bellies of weary travelers. Inspired by the impressive Wizarding World cauldron tower [Universal Studios, Orlando] we collected a few cauldrons of our own.

◊ long wooden dowel
◊ chalk/silver Sharpie/etc. to mark drill holes
◊ hand drill with drill bit roughly the size of the wooden dowel
◊ sturdy scrap ie. of wood
◊ black spray paint [1 can]
◊ Rust-Oleum Copper Hammered Spray Paint [2-3 cans]
First, I spent some time stacking and re-stacking the loose cauldrons until I had a tower I was pleased with. Take a photo of it with your phone for future reference. Then, I simply held the dowel up at an angle that would line it up with all of the cauldrons.
I marked roughly a| where the dowel would rest inside the bottom cauldron, and b| where the dowel would pass through each of the other cauldrons. Then, I drilled a hole at those marks. [The mark inside the bottom cauldron is not a hole. It's just a mark to help align your dowel.]
With the holes drilled, I spread the cauldrons out on a large and sturdy scrap of wood outside to catch the overspray, and to keep the lightweight cauldrons from falling over. Admittedly when I was shopping for paint, I was mesmerized by the copper hammered texture. Because you'll be positioning and repositioning your cauldrons on the dowel, consider a spray paint meant specifically for plastic with primer [for added durability].
As for the amount of paint you'll need, that will depend on the number of coats it will take to achieve the look you want. For me, it was 4 coats. I did flip them upside down to spray the bottoms, but I didn't attempt to spray inside. To help camouflage the dowel you can spray it black.I marked roughly a| where the dowel would rest inside the bottom cauldron, and b| where the dowel would pass through each of the other cauldrons. Then, I drilled a hole at those marks. [The mark inside the bottom cauldron is not a hole. It's just a mark to help align your dowel.]
 |
| Our inspiration. The Wizarding World of Harry Potter Universal Orlando Resort |
With the holes drilled, I spread the cauldrons out on a large and sturdy scrap of wood outside to catch the overspray, and to keep the lightweight cauldrons from falling over. Admittedly when I was shopping for paint, I was mesmerized by the copper hammered texture. Because you'll be positioning and repositioning your cauldrons on the dowel, consider a spray paint meant specifically for plastic with primer [for added durability].
Once the cauldrons and dowel had dried, we assembled our tower! With the dowel aligned with the mark inside the bottom cauldron and using our reference photo, we slid the other cauldrons onto the dowel. Each cauldron sort of fits into the one before it, and the dowel is to keep the tower from falling over.
//////////////////////////////////////////////////////////////////////
Hubby and I had such a great time running our Halloween tavern! A special Thank You to Allison for the opportunity to participate in her 30 Days of Halloween series! Be sure to follow her series for more great posts HERE. Links can also be found below.
Happy Haunting
Ok this is totally awesome! You guys are amazing and I really want to come to one of your parties with all this fun stuff. LOVE this! Thanks for taking part in the series and sharing this! :)
ReplyDeleteThanks Allison :) Hubby and I take Halloween seriously, LOL. I'm SUPER excited to see the other posts.
DeleteOhmygosh this is so cool!!!! I love it!!
ReplyDeleteYvonne @ TriedandTasty.com
Thank you so much. This is something we SO love to do.
DeleteThanks for the cute ideas. We are going to be having a Halloween Party for my daughter this year and I love your ideas. Thanks :)
ReplyDeleteI'd love to know more about your theme! I wish more people threw family-friendly Halloween parties.
Delete